





EZPZ ATR Stop/Profit FREE
EZPZ ATR Stop/Profit
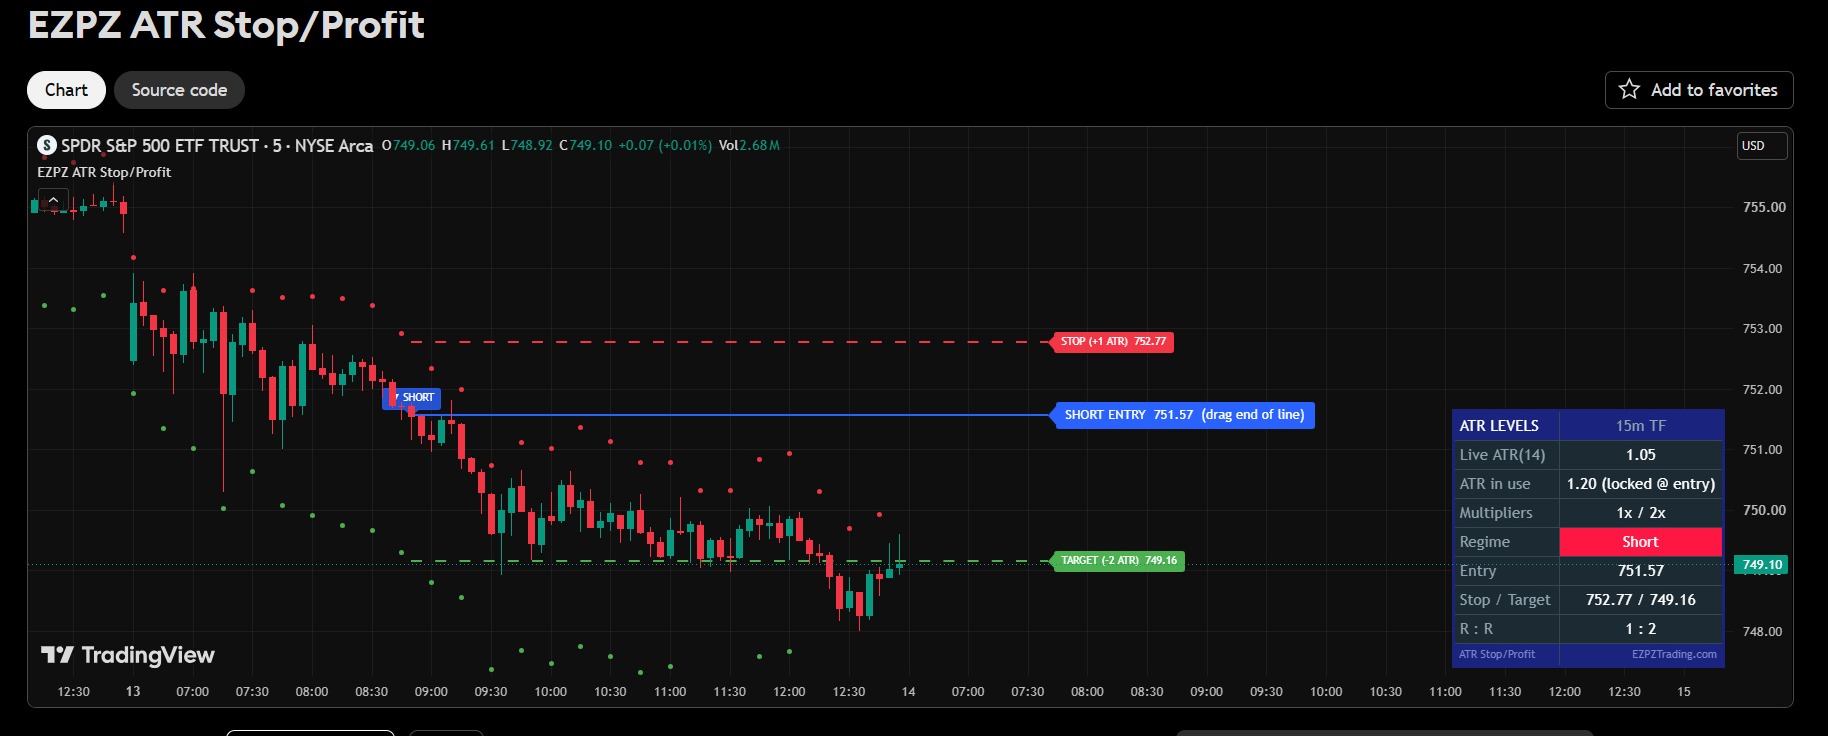
Stop placement is where most intraday traders lose their edge — stops drawn too close to price get clipped by ordinary noise, and targets placed by eye break the risk-to-reward math. This indicator removes the guesswork: it plots your entry, stop loss, and take profit at exact ATR-based distances, using the ATR of a timeframe you choose (default 15-minute), on any chart timeframe — and always maintains a 1:2 risk-to-reward ratio, where your target distance is exactly double your stop distance.
WHAT IT DOES
Multi-timeframe ATR: levels are calculated from your chosen ATR timeframe (15m default) even while you trade on the 1-minute chart. Non-repainting — the ATR uses the last confirmed higher-timeframe bar, so levels never shift after the fact.
One-click entry: when you add the indicator, your cursor becomes a crosshair. Click your entry candle at your entry price — one click captures both price and time. The entry label shows "(drag)" — you can move it anytime by dragging the point, or right-click the indicator name → "Reset points..." Or manually enter the point where you went short or long.
SELECT THE REGIME
You will need access to EZPZTrading.com to grab the current regime and select the appropriate regime (direction) manually. What does this mean:
Select Regime (Long / Short / None): choose Long and a solid red STOP line is drawn 1× ATR below your entry with a solid green TARGET 2× ATR above it. Short is mirrored — stop above, target below. Red is always where you're wrong; green is always where you get paid. Set to None for scouting mode: entry line only, with neutral gray rolling levels.
ATR locked at entry: the moment your entry is placed, the ATR is frozen ("locked @ entry" in the table). Your stop and target never drift during the trade. This also makes it a backtesting tool — click any historical bar and the levels are exactly what they would have been at that moment.
Rolling ATR levels (Optional): dots (or a stepped line — your choice) show where the stop/target distances currently sit relative to price, updating once per ATR-timeframe bar. Direction-aware: with Long or Short selected they're color-coded red/green and show only your two relevant levels.
Info table: ATR timeframe, live ATR, locked ATR in use, multipliers, direction, entry price, exact stop/target prices for your bracket order, and your R:R ratio — with a red INVERTED warning if the stop multiplier is ever set larger than the target.
Alerts: direction-aware alert conditions for Stop hit and Target hit, for both long and short trades.
HOW TO USE IT
Add the indicator → click your entry candle at your entry price.
In settings, set Select Regime to Long or Short based on your directional bias.
Read the Stop / Target row in the table — those two prices are your bracket order.
Size your position from your account risk rules: ATR tells you WHERE the stop goes; your account risk determines HOW MANY shares or contracts.
Let the trade play out. No moving stops closer, no cutting winners early. Optionally set alerts on the stop/target levels.
MULTIPLIER GUIDANCE (keep the ratio 1:2 always)
First two hours of the session (highest volatility): standard 1× ATR stop / 2× ATR target.
Strong trend days: can expand to 2× / 4×.
Midday or slow, low-volatility sessions: reduce to 0.50× / 1× or even 0.35× / 0.70×.
The ratio never changes — only the physical distance scales to what the market is actually delivering. We measured this on SPY across 250 trading days of 15-minute bars: the opening bar averages roughly twice the true range of midday bars, and about 40% of the day's total movement happens in the first two hours. Trade the window where the market actually produces the movement your target requires.
NOTES
Works on stocks, ETFs, futures, and any symbol with intraday data.
For minute-precision entry times, place the entry point while on a 1-minute chart.
The Manual ATR Lock field lets you override the ATR value if needed; 0 = automatic.
This indicator provides objective level placement — it is not financial advice, and no tool guarantees results. Risk management and position sizing remain your responsibility.